


")


MySQL Master Slave Replication for database load balancing
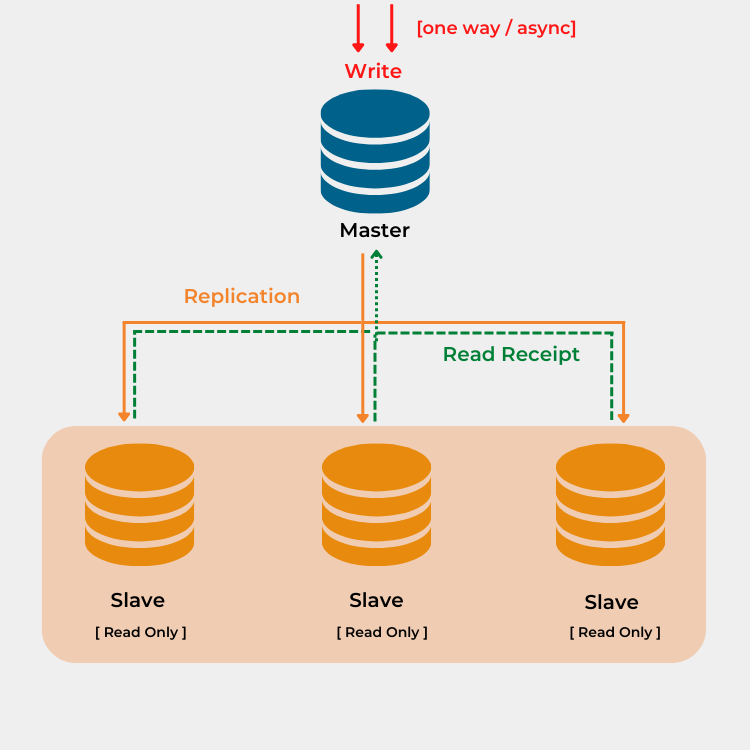
MySQL replication is a method of storing data on many systems, and this data is automatically copied from one database (Master) to another database (Slave). If one server goes down, the data can still be accessed from the other servers (Slave) database.
In this article, we’ll look at how to set up MySQL Master-Slave replication in CentOS 7. This method will work on all Linux distributions, including RHEL, CentOS, Ubuntu, and openSUSE etc. All you need to know is how to install MySQL in the specific distribution you use
MySQL Replication Types

There are three types of replication features, depending on how data transfer is managed when transferred from the master to the slaves.
Asynchronous – slaves do not need to be connected permanently to receive updates from the master. By default, MySQL Replication is asynchronous.
Semi-synchronous – With semi-synchronous replication, a commit performed on the master side is held until at least one slave acknowledges that it has received and logged the events for the transaction.
Synchronous– Slaves must acknowledge receipt from the master.
Please go through the link for detailed information.
MySQL Replication Setup
We will be using the following two systems for this tutorial. But you can use any Linux distribution to set up MySQL replication. Only the installation of MySQL will differ for different Linux Operating Systems.
Installing LAMP Stack on Linux
Here is the testing systems details:
MySQL Master: CentOS 7 64bit Minimal Server
Master IP Address: 10.0.6.25
MySQL Slave: CentOS 7 64bit Minimal Server
Slave IP Address: 10.0.6.64
Configure the MySQL Master Server for Replication
1.The first step is to allow MySQL default port “3306” through Firewall or Router.
As we use CentOS 7, we can allow the port as shown below.
firewall-cmd --permanent --add-port=3306/tcp
Reload firewall rules using command:
firewall-cmd --reload
2. Edit /etc/my.cnf file,
vi /etc/my.cnf
For testing the replicating data, we are going to set up a Sample MySQL Database from github.
git clone https://github.com/datacharmer/test_db
cd test_db/
mysql -u root -p < employees.sql
2.1 And add the following lines under [mysqld] section
server-id = 1
binlog_do_db = employees
log_bin = /var/log/mysql/mysql-bin.log
2.2 (Optional) If you are using a MariaDB database server, then you should add the following lines to the my.cnf file.
[mysqld]
server_id=1
log-basename=master
log-bin
binlog-format=row
Here “employees” is the database name to be replicated to the Slave system.
P.S. Remove the binlog_do_db and binlog_ignore_db configuration options from the master my.cnf configuration file
The above parameter should not be included in case of a single DB replication as it may cause sync issues and the filtering should be done on the slaves.
3. Once you are done, restart the MySQL service using command:
systemctl restart MySQL
Now login to MySQL as root user:
mysql -u root -p
4. Create a Slave user and password. For example, we will use replication as Slave username and “nKHnhZXa2SY82jm” as password:
MySQL [(none)]> STOP SLAVE;
Query OK, 0 rows affected, 1 warning (0.00 sec)

MySQL [(none)]> GRANT REPLICATION SLAVE ON *.* TO 'replication'@'%' IDENTIFIED BY 'nKHnhZXa2SY82jm';
Query OK, 0 rows affected (0.00 sec)

MySQL [(none)]> FLUSH PRIVILEGES;
Query OK, 0 rows affected (0.00 sec)

MySQL [(none)]> FLUSH TABLES WITH READ LOCK;
Query OK, 0 rows affected (0.00 sec)

MySQL [psa]> SHOW MASTER STATUS;
+--------------------+----------+--------------+------------------+
| File           	| Position | Binlog_Do_DB | Binlog_Ignore_DB |
+--------------------+----------+--------------+------------------+
| MySQL-bin.000001 |  	803 | employees	|              	|
+--------------------+----------+--------------+------------------+
1 row in set (0.00 sec)

MySQL [psa]> exit
Bye
Note down the file (MySQL-bin.000001) and position number (803), you may need these values later.
5. Before start configuring the slave, backup and copy the data from the master to the slave.
mysqldump -u root -p employees > employees-backup.sql
scp employees-backup.sql root@null10.0.6.64:/root/
Configure MySQL Slave for Replication
We have done the Master side installation. Now we have to start on the Slave side.
Install MySQL packages on the Slave server as stated in the MySQL installation section. Furthermore, don’t forget to allow port “3306” through the firewall/router.
1. Edit file /etc/my.cnf
vi /etc/my.cnf
And add the following entries under [mysqld] section as shown below.
server-id           	= 2
log_bin             	= /var/log/mysql/mysql-bin.log
binlog_do_db        	= employees
relay-log           	= /var/log/mysql/mysql-relay-bin.log
1.1 (Optional) If you are using a MariaDB database server, then you should add the following lines to the my.cnf file.
[mysqld]
server-id = 2
Replicate-do-db = employees
Here, “employees” is the database name of the Master server. Be mindful that you should use different server-id for both master and slave servers.
Save and exit the file.
2. Import the master database using the command:
mysql -u root -p < /root/employees-backup.sql
3. Now, log in to MySQL as a root user and run the below Type the following SQL command to activate replication.
MySQL [psa]> STOP SLAVE;
Query OK, 0 rows affected, 1 warning (0.00 sec)

MySQL [psa]> CHANGE MASTER TO MASTER_HOST='10.0.6.25',
MASTER_USER='replication', MASTER_PASSWORD='nKHnhZXa2SY82jm',
MASTER_LOG_FILE='MySQL-bin.000001', MASTER_LOG_POS=803;
Query OK, 0 rows affected (0.01 sec)
Now start the slave with the START SLAVE command and if you want to check the status of the slave use the SHOW SLAVE STATUS command:
MySQL [psa]> SLAVE START;
Query OK, 0 rows affected (0.01 sec)

MySQL [psa]> SHOW SLAVE STATUS\G;
*************************** 1. row ***************************
           Slave_IO_State: Waiting for master to send event
           Master_Host: 10.0.6.25
           Master_User: replication
           Master_Port: 3306
           Connect_Retry: 60
           Master_Log_File: MySQL-bin.000003
      	   Read_Master_Log_Pos: 1117
           Relay_Log_File: MySQL-relay-bin.000006
           Relay_Log_Pos: 531
           Relay_Master_Log_File: MySQL-bin.000003
           Slave_IO_Running: Yes
           Slave_SQL_Running: Yes
           Replicate_Do_DB: employees
      	   Replicate_Ignore_DB:
       	   Replicate_Do_Table:
      	   Replicate_Ignore_Table:
      	   Replicate_Wild_Do_Table:
           Replicate_Wild_Ignore_Table:
           Last_Errno: 0
           Last_Error:
           Skip_Counter: 0
      	   Exec_Master_Log_Pos: 1117
           Relay_Log_Space: 827
           Until_Condition: None
           Until_Log_File:
           Until_Log_Pos: 0
       	   Master_SSL_Allowed: No
       	   Master_SSL_CA_File:
       	   Master_SSL_CA_Path:
           Master_SSL_Cert:
           Master_SSL_Cipher:
           Master_SSL_Key:
    	   Seconds_Behind_Master: 0
           Master_SSL_Verify_Server_Cert: No
           Last_IO_Errno: 0
           Last_IO_Error:
           Last_SQL_Errno: 0
           Last_SQL_Error:
           Replicate_Ignore_Server_Ids:
           Master_Server_Id: 1
1 row in set (0.00 sec)
Test MariaDB or MySQL Replication
In the master server, add a record to the employees table using the following command:
MySQL [employees]> INSERT INTO employees (emp_no, birth_date, first_name, last_name, gender, hire_date)
VALUES (500003, '1900-01-01', 'Ankur', 'Barman', 'M', '2000-01-01');
Query OK, 1 row affected (0.00 sec)

MySQL [employees]>
After adding some records in master server, go to slave server and verify if the data is replicated or not :
MySQL [employees]> SELECT * FROM employees.employees WHERE emp_no=500003;
+--------+------------+------------+-----------+--------+------------+
| emp_no | birth_date | first_name | last_name | gender | hire_date  |
+--------+------------+------------+-----------+--------+------------+
| 500003 | 1900-01-01 | Ankur  	| Barman	| M  	| 2000-01-01 |
+--------+------------+------------+-----------+--------+------------+
1 row in set (0.00 sec)

MySQL [employees]>
Monitor MySQL master slave replication with a Shell script
Here is a simple shell script to notify secondary read-only replica (slave) MySQL server health status failure via email.
Set up a cron job as follows to monitor the MySQL slave server health. This will run the script for every 10 minutes and send a health report via email.
*/10 * * * * root /root/bin/check-mysql-slave-server-health
Conclusion on MySQL replication
In this guide, we have taken you through the steps of setting up a Master-Slave configuration for your MySQL databases on two separate Linux VPS instances. We also have proven the concept by adding a sample database and some records.
Here are some links to our recommended blog posts for more helpful tips and howtos:
Are You Looking for a Managed MySQL Replication Hosting Service?
Certified Linux System Admins | Daily Offsite DC Backups