


")


Our Guide How to install cPanel on Ubuntu 20.04 LTS
You may be looking for control panel software that allows you to manage your websites and web applications in a graphical user interface. There are many control panel solutions for web hosting, and cPanel/WHM is one of the most popular.
This control panel allows you to manage and customise many aspects of your server in a user-friendly environment like publish a website, create emails & calendars, transfer & manage files, Manage domains, Launch databases etc.
Interested in cPanel Hosting ?
Our managed VPS Hosting Plans
includes Weekly Offsite DR Backups
In this article, we will learn how to install cPanel on Ubuntu 20.04 LTS using the command-line interface.
There are two platforms: cPanel and WHM.
WHM (Web Host Manager) provides administrative control over your dedicated server or VPS. It allows a hosting provider to manage a customer’s account.
cPanel is an end-user dashboard, for managing individual hosting accounts.
Some of the difference between WHM and cPanel are listed below:
| Feature | WHM | cPanel |
| Controller | WHM is a Reseller control panel. It is used by resellers to manage all the hosting accounts associated with their reseller plans. | cPanel is the control panel used by the end users under a reseller or hosting provider. Customers use it to manage their accounts. |
| Access | The WHM interface provides resellers with exclusive root-level access. | cPanel provides only access to the web hosting account on the server to its users. |
| Port number | WHM functions via 2087, a secure port number. | cPanel on the other hand functions via 2083 as its secure port number. |
| Password reset |
if you change the password of your WHM, then the password of cPanel will also change. |
The password for cPanel can be set by the end user however they want. |
| Domains | You can only add domains, not subdomains. | Adding and removing add-on domains and subdomains can be done. |
Server System requirements for cPanel installation
Make sure before installing the cPanel control panel, your server must not have any other kind of software installation. This means we need a new server without any other preinstalled software
- A clean installation of Ubuntu 20.04 LTS server
- Processor– Minimum: 1.1 GHz and Recommended: 2 GHz
- RAM – Minimum: 1 GB and Recommended: 4 GB
- Disk Space– Minimum: 20 GB and Recommended: 40 GB
- Architecture– 64-bit
- Static IP address
- Standard hostname (FQDN or Fully Qualified Domain Name)
Firewall setup for cPanel/WHM
If you are using some Cloud Platform such as AWS EC2, LightSail, Digital Ocean, Google Cloud, or any other server, then the below ports required by the WHM and cPanel needs to be whitelisted in the Network firewall.
TCP – 2077, 2078, 2082, 2083, 2086, 2087, 2096, 3306, 53
UDP- 53
Run system update on the Ubuntu CM
To ensure that all the existing packages have their latest versions, you should run the system update command before installing any server software platform.
sudo apt update
sudo apt upgrade
Set fully qualified hostname on Ubuntu 20.04
For proper installation, cPanel requires a FQDN (formal qualifier domain name). Please ensure that you have set the hostname to the domain name that you are planning to use with it.
To check your existing hostname type-
hostname
Now, open /etc/hosts file and add the below entry
10.0.6.60 test.diadem.in test
Save and exit the file by pressing Ctrl + O, hit the Enter key, and then Ctrl+X to exit.
Reboot the server
reboot
Install cPanel on Ubuntu 20.04 Server
Let’s use the Linux screen utility to create a shell session that will remain active even after the network disruption so that you won’t lose a glance at what is happening.
Download the latest installation script to the home directory.
cd /home && curl -o latest -L https://securedownloads.cpanel.net/latest && sh latest
Allow the system to perform the installation, and wait for a few minutes. When it is completed, you will receive a message as below :
[2022-09-12 16:19:06 +0530] [22752] ( INFO):
[2022-09-12 16:19:06 +0530] [22752] ( INFO): https://43.239.192.78:2087
[2022-09-12 16:19:06 +0530] [22752] ( INFO):
[2022-09-12 16:19:06 +0530] [22752] ( INFO): Visit https://go.cpanel.net/whminit for more information about first-time configuration of your server.
[2022-09-12 16:19:06 +0530] [22752] ( INFO):
[2022-09-12 16:19:06 +0530] [22752] ( INFO): Visit http://support.cpanel.net or https://go.cpanel.net/allfaq for additional support
[2022-09-12 16:19:06 +0530] [22752] ( INFO):
[2022-09-12 16:19:06 +0530] [22752] ( INFO): Thank you for installing cPanel & WHM 11.106!
root@docker:/home#
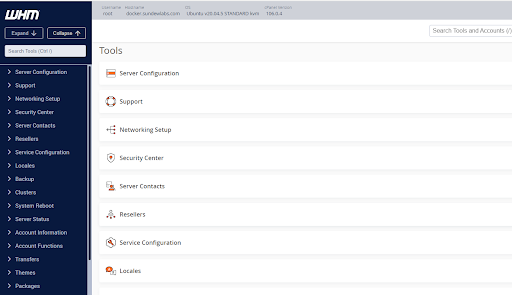
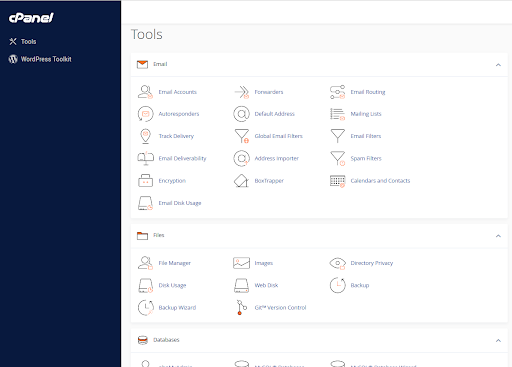
How to access WHM/cPanel?
To access WHM in your browser type <your-server-IP-address>:2086 in the same way <server-IP-address>:2082 for cPanel.
For SSL connection, use <domain.com>:2087 for WHM and <domain.com>:2083 for cPanel.
Login using Ubuntu root user
When you get the login screen, enter the root as username and the password set for it on your Ubuntu 20.04 Server.

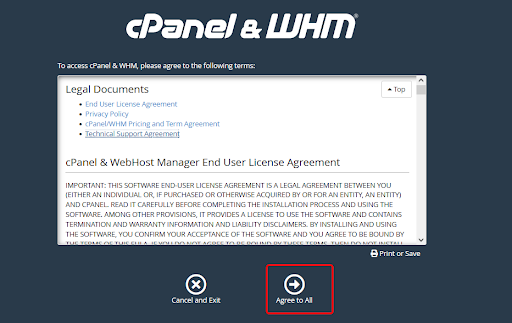
Read cPanel terms and select “agree to all”.
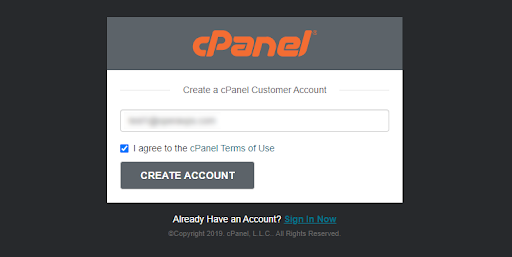
As you can see, it will ask you to log in into your cPanel Store account, which we will create now, so choose login to continue.

In this step, there are 2 options that we can choose from. To log in to your existing cPanel Store account if you have one, or to sign up for a new account.
Click on the create an account option to create a new account.

Enter your email address, agree to cPanel terms of use, and click to create an account.
Now, you will receive an email to set a password for your cPanel customer account. Once your new password has been created, choose to allow access.

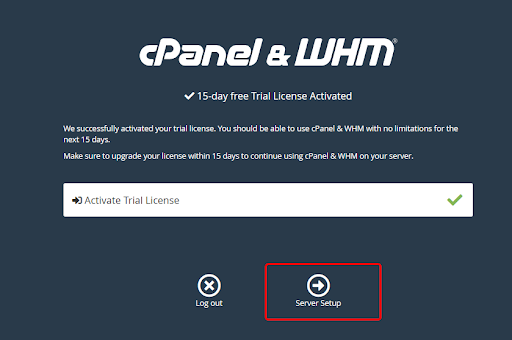
In this step, you will receive a code that you should enter to activate your account with a 15 days free trial license for cPanel/WHM.

This page indicates that your trial license activation was successful. You can now proceed to the server setup section. Click ‘Server Setup’ button to proceed further.
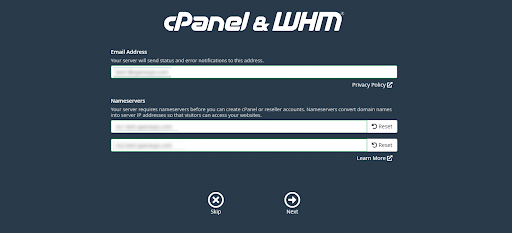
You should enter an email address in the next section to be notified of probable errors.
Then you should enter 2 name servers. Name servers are used to connect your domain or subdomain to your WHM server. You need to create the child nameservers in your domain panel and map to the server for the name servers to get enabled. Follow the cPanel/WHM nameserver guide to learn more.
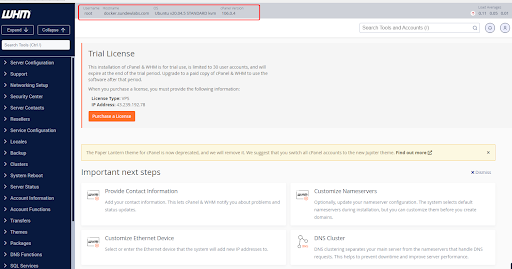
You will now see the cPanel home page. Start setting up a cPanel account and other settings.
Purchase, Verify And Update Your cPanel License
After competing the cPanel installation on Ubuntu, you may be required to activate your license. Below are some options that will help you purchase or verify your activated license.
- Purchase cPanel License: You can order a cPanel license through the licenses page of our website.
- Verify the cPanel License: If you want to check whether your license has been successfully activated or not, you can use the cPanel verification system.
- Update cPanel License: After you order a license, you should run the following command inside your server, and the license will be updated.
/usr/local/cpanel/cpkeyclt
Plesk or cPanel: Our Thoughts
Both cPanel and Plesk are industry best web hosting panels with similar set of features and functionality and are well established since the beginning of web hosting services. If you want to evaluate Plesk Panel, you may want to checkout our other article on how to install Plesk Obsidian on CentOS 7 and an Alternative to cPanel. Both panels are well established and meet the needs of their respective audience with a very large installed base of customers and users.
Plesk is more focused on modernisation, user-friendliness, and better support for individuals, whereas cPanel provides a stronger infrastructure for enterprises and resellers with a higher price for its licensing fee. Also Plesk is available for managed windows vps and managed dedicated servers with the same user interface and functionality so managing Linux and Windows servers in a mixed environment is easier with Plesk as the learning curve is much shorter.
Book a Free Consultation with a cPanel Expert
We Host with Equinix India TIER IV IDC
The Global Leader for Datacenter Services