Windows Server Update Services – Why Is it Important?
WSUS Administration Server allows system administrators to manage the distribution of updates and hotfixes released for Windows server operating systems and Microsoft software.
System administrators and IT administrators are responsible for keeping their organisation’s computers up to date with the latest patches and software updates. One way to do this is by using Windows Server Update Services (WSUS). In this blog post, we will show you how to set up WSUS server on a Windows 2019 VM.
What is a WSUS Server?
Windows Update Servers are an important part of keeping your Windows system up to date and running smoothly. By using a Windows Update Server, you can ensure that your system always has the latest features and security updates. WSUS works by downloading updates from Microsoft and distributing them to connected computers.
Benefits of WSUS patch management
The Windows Server WSUS is a patch management wsus application that can be used to manage Microsoft products updates. WSUS provides many benefits, including:
- Reducing the amount of time spent managing updates;
- Automatically approving recommended updates for installations;
- Forces updates during a specified maintenance window; and
- Reporting on compliance with update deployments.
How to Setup a WSUS Patch Management Server in a Windows 2019 VM
Spin up a Windows 2019 VM
Step 1: Create a fresh VM with the required resources. We are providing screenshots from SCVMM but you can spin up a VM with the OS of your choice for the WSUS server.

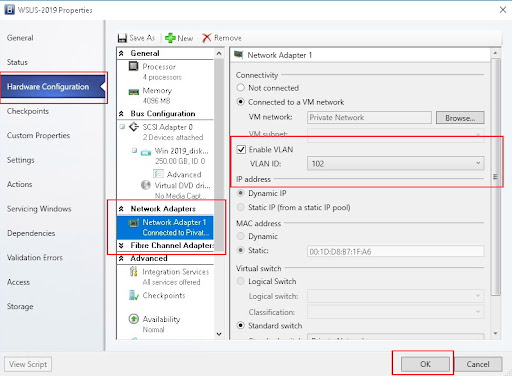
Step 2: Connect the network adapter to the designated VLAN
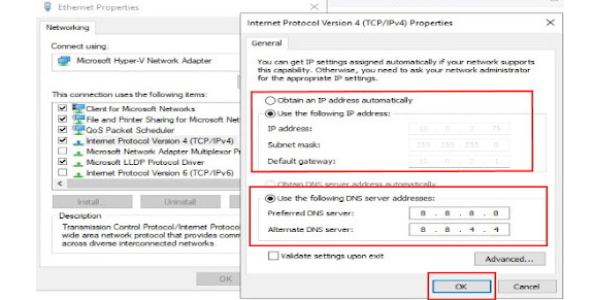
Step 3: Start the VM and configure the IP address.
Step 4: The server name is changed and VM is rebooted.

Add a WSUS Server Role
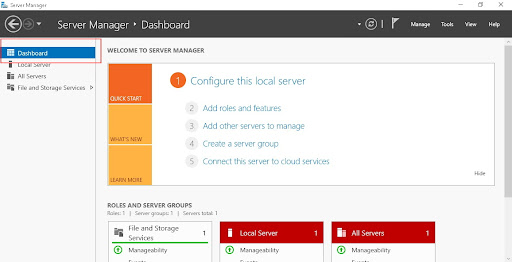
Step 1: In the server manager dashboard under Configure this local server section, click Add roles and features.
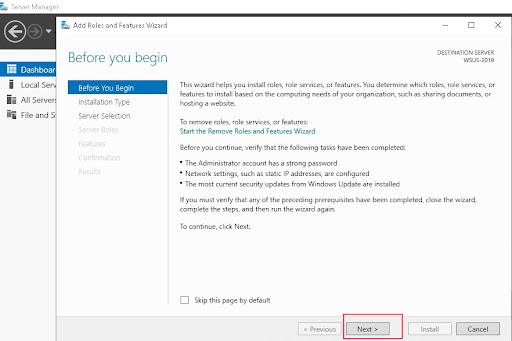
Step 2: In the next screen click the Next button.
Step 3: Then select Role-based or feature-based installation and click Next button.
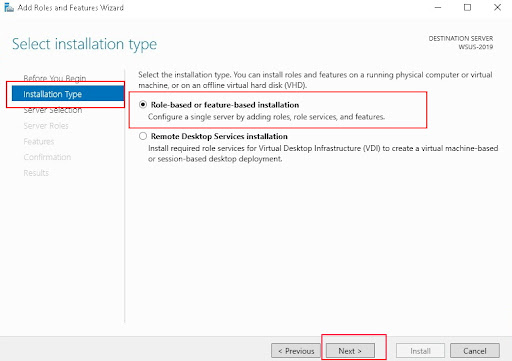
Step 4: In the next stage again click Next button keeping the setting unchanged as shown below.

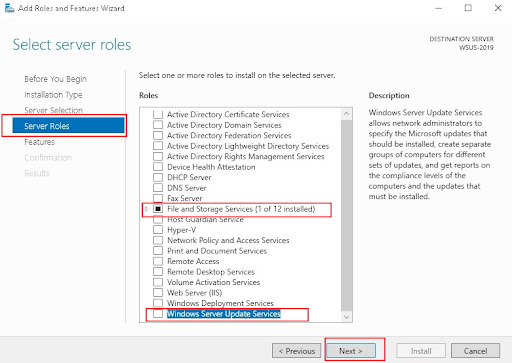
Step 5: In the next step select the tick mark on Windows server update services.
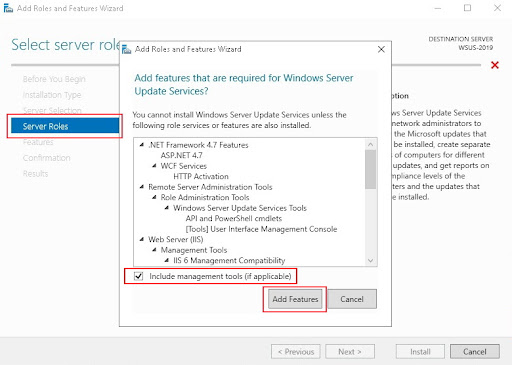
Step 6: In the next popup screen click the Add features button keeping all settings as it is. It should be like the screenshot below.
Step 7: In the next stage just click the Next button, without making any changes to the selection.

Step 8: Again in the next screen (Select Features) click the Next button, without making any change in the selection of features.

Step 9: In the next stage click the Next the button and proceed.

Add IIS Role to the Windows Update Server
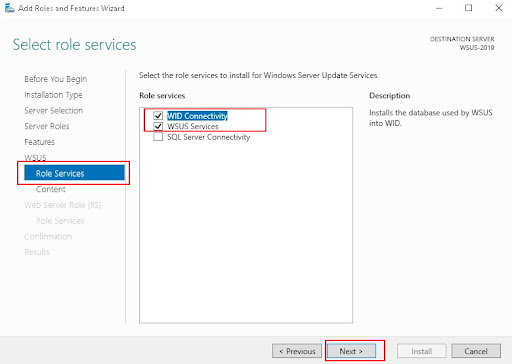
Step 1: In the next screen (Select role services) keep the selections unchanged and click the Next button. The selections should be like below.
Step 2: Provide the update storage path in the next stage. We used C:\Updates in our cases.
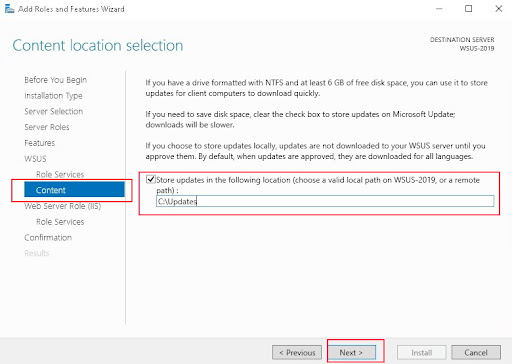
Step 3: In the next stage click the Next button and proceed. Content colour

Step 4: In the next step, keep all selections unchanged and click the Next button.
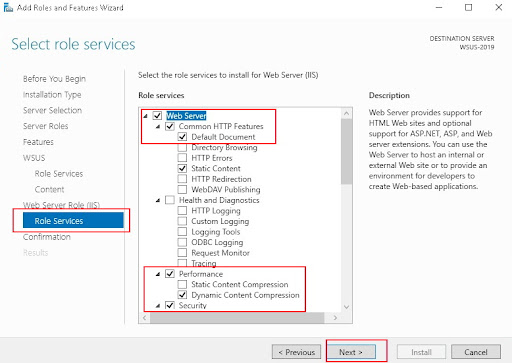
Step 5: Then click the Install button.

Step 6: Installation progresses.

Step 7: Installation is complete now. Click on the Lunch Post-installation tasks link.

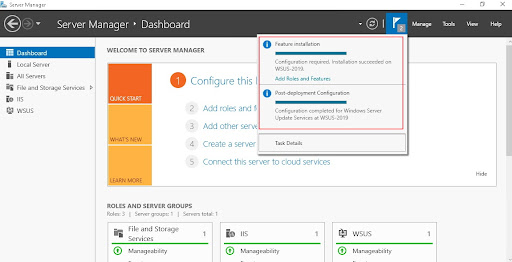
Step 8: Post-Deployment Configuration continues for windows server update services.
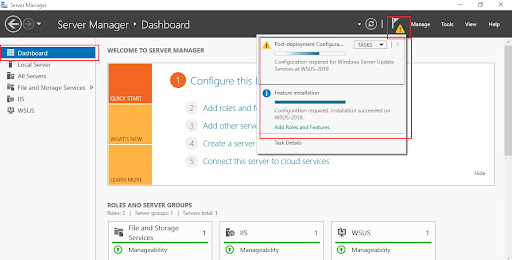
Step 9: Post-Deployment Configuration completes.
WSUS Management Console Access
Step 1: Now we open the WSUS (windows server update services) management console.

Step 2: In the next stage select the Yes checkbox and click the Next button.
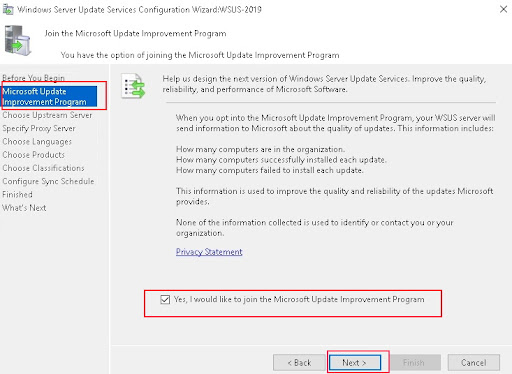
Step 3: In the next stage select Synchronize from Microsoft Update and click the Next button.
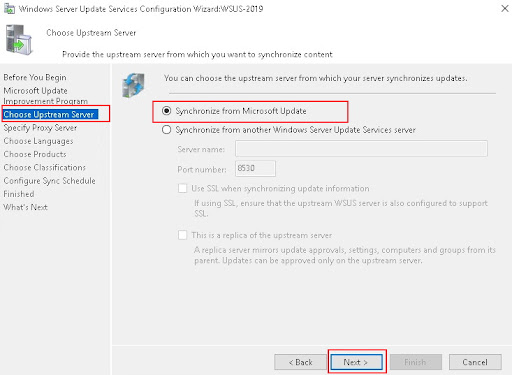
Step 4: We don’t use a proxy server. Keep these blank and click the Next button.
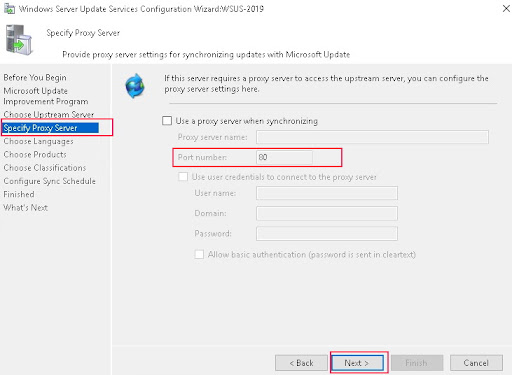
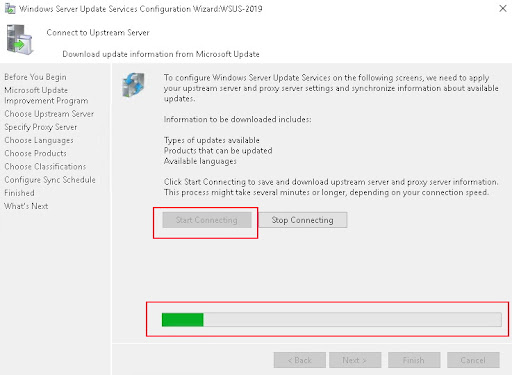
Step 5: Then in the next click Start Connecting button.
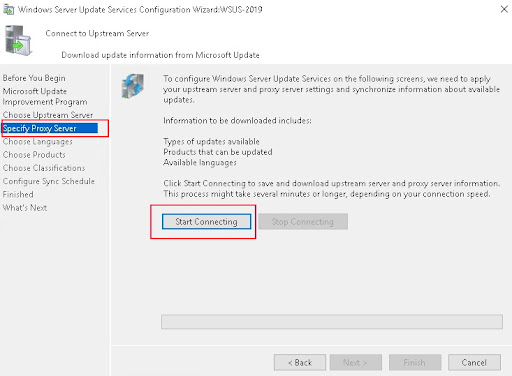
Step 6: It takes a while to download the updated catalogs.
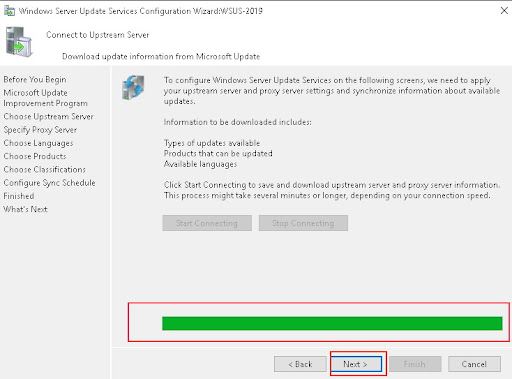
Step 7: Catalogs are ready now. Click the Next button.
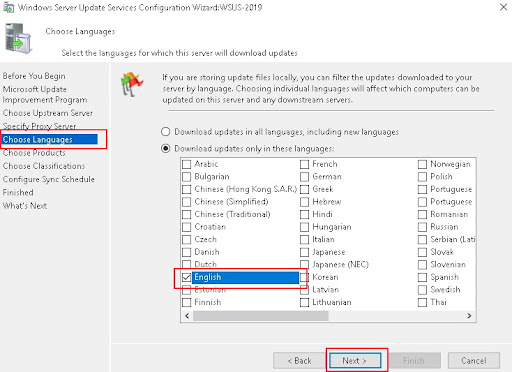
Step 8: Select only the English language and click the Next button.
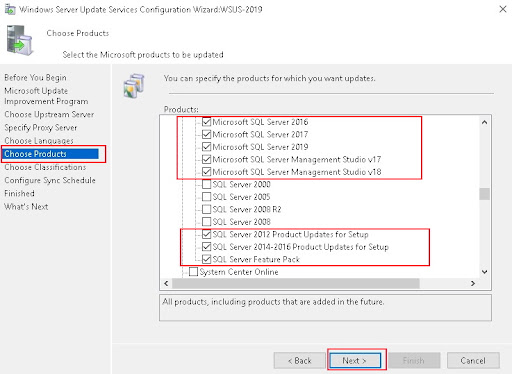
Step 9: We will select SQL Server 2012 to 2019 updates Management Studio v17 and v18 updates.

Step 10: We will also select an SQL server-related other updates as shown below.
Step 11: Select update for Windows Admin Center.

Step 12: All updates in the Windows section are also selected. Then Next button is clicked.

Step 13: On the next page all classifications are selected.

Step 14: Set an automatic synchronization schedule in the next step.
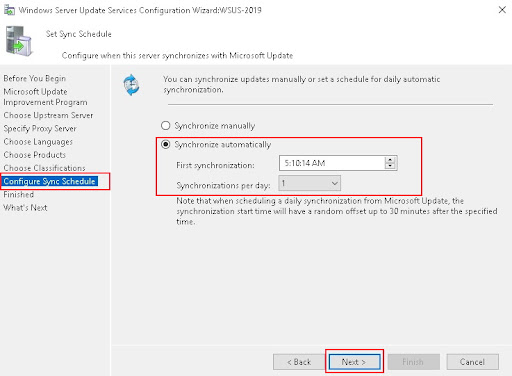
Step 15: Then click Begin initial synchronization checkbox and click the Next button.
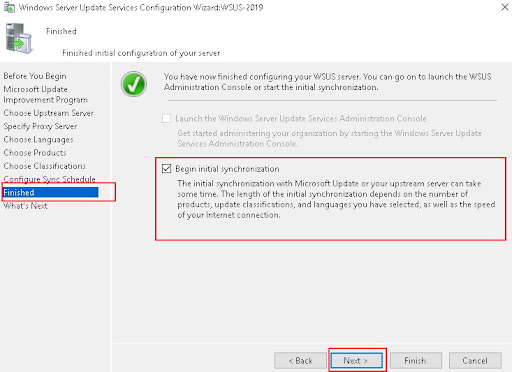
Step 16: Then click finish.

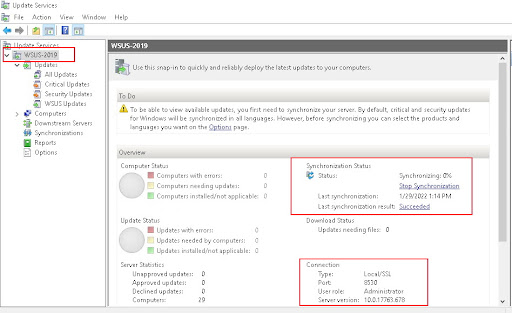
Step 17: In the dashboard of the Update Services console, the progress of synchronization will be visible.
Client Server Updates
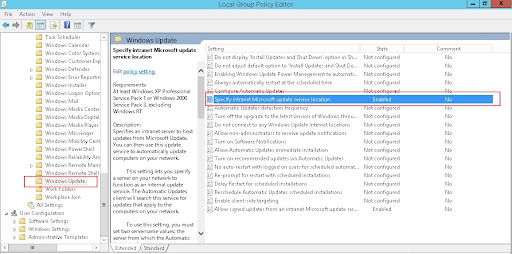
Step 1: On Client VM, go to Group Policy Editor. Go to Computer Configuration -> Administrative Template -> Windows Components -> Windows Update section.
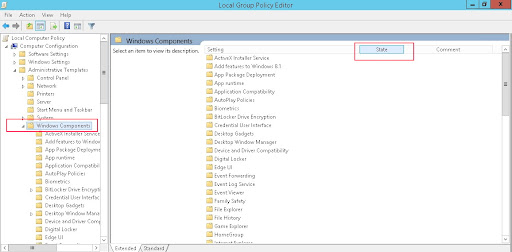
Step 2: Double click to open policy Specify intranet Microsoft update service location.
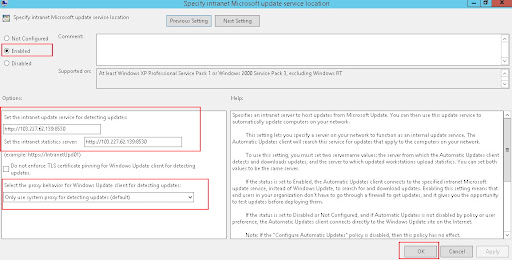
Step 3: Enable it and set the settings as below (http://103.227.62.139:8530 in both intranet update service and statistics server settings).
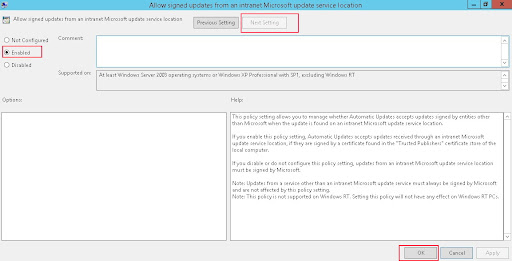
Step 4: Also enable the policy Allow signed updates from an intranet microsoft update service location.
Conclusion on WSUS Server Setup
WSUS servers connect to the internet to download updates and patches for the systems they manage. WSUS server is an excellent solution for VPS with Windows, It allows businesses to deploy patches on their own schedule and ensure that all systems are up-to-date. This guide provided step-by-step instructions for setting up a WSUS server. By following these steps, you can take advantage of the many benefits that WSUS has to offer.The WSUS service packs are designed to improve the security and stability of our systems, ensuring that our network is protected from vulnerabilities If you need assistance with your WSUS server hosting or any other aspect of your Cloud hosting infrastructure provider, contact Diadem Technologies today. Our experienced team can help you get the most out of your technology investments.
Check out our blog post on How to Check MySQL Version In Windows and utilize the MySQL version in Windows. Learn tips and tricks and find out which version you are running.
Looking for a Managed
|


