


")


Continuous intrusion attempts on RDP and SQL server in Windows dedicated and VPS environment is a big issue for system admins. They may drain a considerable amount CPU time and Memory resource of any server as thousands such attempts can be made within a span of few minutes by the automated attacking bots. Changing RDP and SQL port to a custom one can solve this issue, but these require client side configuration changes, which may be uncomfortable for the client due to many reasons. Also the modified port number again can get exposed to the attacking bots, due to presence of a Trojan or Malware on the client system.
IPBan software written by Jeffrey N. Johnson (jjxtra) comes to a great relief in tacking this nagging issue on Windows servers. IPBan is installed as a service under Windows operating system and listens for a failed logon event on the server. Whenever an failed logon attempt is made, it starts tracking the source IP and when number of such events reach a certain predefined threshold for that IP, within a specified time span, it Block that IP in the Windows Advanced Firewall using a Blocking rule there. The IP remains banned for a predefined amount of time after this. All these time and threshold values are configurable through the configuration file of the IPBan software. IPBan is a free tools which can be downloaded from jjxtra’s website Digitalruby.com and is updated often.
Now let us follow the steps that are required to install IPBan software on a Windows server:
1. IPBan software can be downloaded from the URL – https://github.com/jjxtra/Windows-IP-Ban-Service/downloads. This software only works on Windows Server 2008/R2.
2. The IPBan software requires .net framework v.4, which can be installed from the URL – http://www.microsoft.com/en-us/download/details.aspx?id=17851 , if not already present in the system.
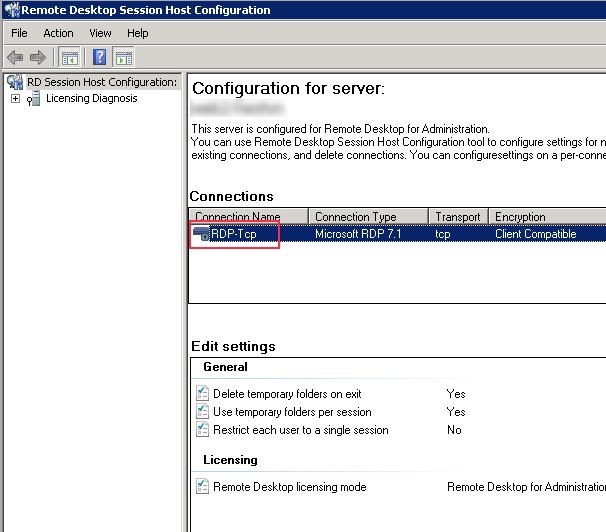
3. In order to enable the Remote Desktop Service to properly log the intruder’s IP addresses in the windows event log, perform the following configuration changes in Remote Desktop Session Host Configuration.
a) Run the Remote Desktop Session Host Configuration tool on Windows Server 2008/R2.
b) Double-click the connection RDP-Tcp to change encryption settings to native RDP encryption.
c) In order to do so change the Security Layer value to RDP Security Layer from the drop-down list in the General tab and click OK.
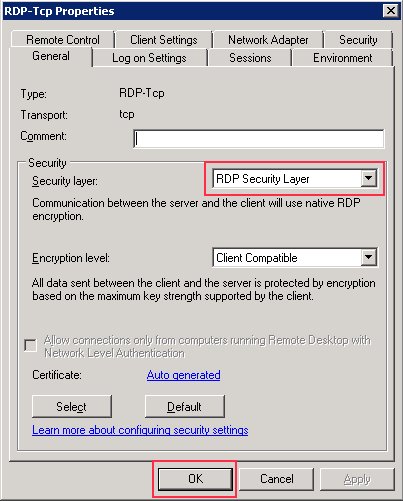
d) Now reboot the server to bring this change to effect.
4. Extract and copy all the files from the downloaded IPBan software zip archive to the folder C:IPBan
5. The IPBan.exe.config file in the folder contains all the configuration settings for IPBan software.
6. The following section configures the number of failed audits in the event viewer before banning the IP address:
[sourcecode wraplines=”false” collapse=”false”]
<add key=”FailedLoginAttemptsBeforeBan” value=”5″ />
[/sourcecode]
Change the value setting according to your requirement.
7. The following section configures the duration of time to ban a failed IP address:
[sourcecode wraplines=”false” collapse=”false”]
<add key=”BanTime” value=”00:00:30:00″ />
[/sourcecode]
Change the value setting according to your requirement in DD:HH:MM:SS format.
8. IPBan Log Rotation can be configured in the following section:
[sourcecode wraplines=”false” collapse=”false”]
<target name=”logfile” xsi:type=”File” fileName=”${basedir}logfile.txt” archiveNumbering=”Sequence” archiveEvery=”Day” maxArchiveFiles=”28″ />
[/sourcecode]
Change the archiveEvery and maxArchiveFiles according to your requirement and availability of storage space for the same.
9. If a named instance of SQL server is in use, then change MSSQLSERVER to MSSQL$ (e.g. MSSQL$SQLEXPRESS) in the following section:
[sourcecode wraplines=”false” collapse=”false”]
<XPath>//Provider[@Name=’MSSQLSERVER’]</XPath>
[/sourcecode]
10. Now open the Command prompt and the run the following commands there to create and start the IPBAN Service –
[sourcecode wraplines=”false” collapse=”false”]
sc create IPBAN type= own start= auto binPath= C:IPBanipban.exe DisplayName= IPBAN
net start IPBAN
[/sourcecode]
Read our related article on The Complete SQL Server 2019 Installation Guide with SSMS